I accidentally deleted a folder with thousands of family trip photos from an external hard drive, and now I’m trying to get them back without making things worse. I’ve narrowed it down to Disk Drill and Stellar Data Recovery, but I’m not sure which one is more reliable for image recovery, especially for RAW files and partially corrupted pictures. Can anyone share real experiences, pros and cons, and which tool you’d trust for recovering important photos?
I went through the whole “which recovery app do I trust with my panic” mess a while ago. Reviews, YouTube, random blogs, trial versions, the lot. I lost days to it.
Here is where I landed, what went wrong for me, and what worked, without the marketing fluff.
I’ll talk about Disk Drill a lot, since that is what bailed me out after I found this post on Reddit:
https://www.reddit.com/r/DataRecoveryHelp/comments/1qi1apk/disk_drill_review/
My first real disaster
External HDD, 2 TB, mostly photos and client work. Windows stopped mounting it and started spamming the “you need to format this disk” dialog. File system showed as RAW. No backups for the last year, which was my fault.
What I tried first:
- A couple of free tools people always mention on tech forums
- One paid tool that looked ancient but “professional”
The results:
- Some tools crashed halfway through the scan
- Some listed a bunch of filenames, but restores were dead files that would not open
- One app spent eight hours scanning and then demanded payment before showing anything useful
I almost formatted the drive out of frustration.
Then I tried Disk Drill. Different story.
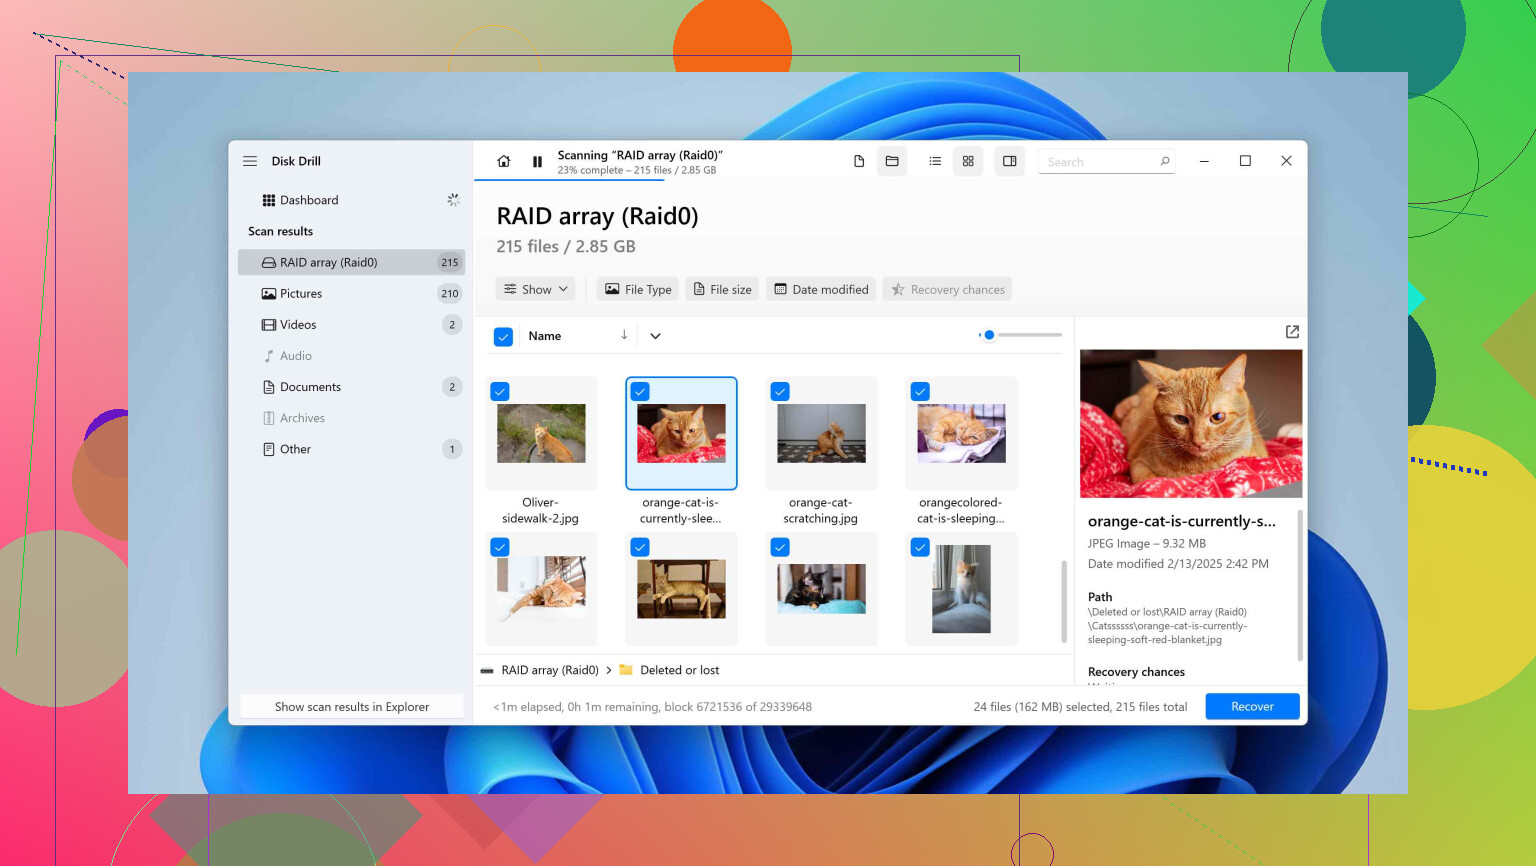
Scanning felt… competent
The first full scan found more data than I thought the drive even held. That threw me off. Turned out it was pulling data from:
- Whatever was left of the file system structures
- Signature-based scanning that looks for known file types by content
So I saw duplicates of some files. At first I thought it was corrupt results, then I realized it was the same content found through different methods.
The important part for you:
- Every single photo I checked opened in the preview
- Office docs opened and looked normal
- Video files played
Other apps had given me lists with nice filenames but broken content. Here I could check inside files before recovering them.
Using the interface without thinking about it
One thing I noticed fast. I did not have to read a manual.
What I saw when I opened it:
- A list of drives, like in a file manager
- A big button to start scanning
I picked the broken drive, hit the button, and it handled the rest. No “quick vs deep vs magic” choice. It stacked the methods itself.
While it scanned, the file tree started filling up:
- Pictures folder
- Videos
- Documents
- Audio
- Archives
You can:
- Filter by type
- Search by name
- Start recovering before the scan finishes if you already see what you wanted
If you are helping a less technical friend or family member, this matters. You do not need to walk them through weird options.
It did not choke on weird devices
Over about a year I used it on:
- A Windows NTFS drive
- An exFAT USB stick with Lightroom catalogs
- DSLR SD cards
- A microSD from a phone that started throwing errors
It handled:
- FAT32
- exFAT
- NTFS
- HFS / APFS from a Mac external
- EXT partitions from a Linux dual-boot disk
It also worked on a RAW disk that Windows wanted to format.
I did not touch any advanced settings. Plugged the thing in, picked the device, scanned.
The preview and “recovery chance” saved me money and time
This part is what I wish every tool had from the start.
Before you restore anything, you:
- Click the file
- It shows a preview for photos, many videos, PDFs, Office docs, text files
On top of that, each file gets a rough recovery rating:
- High
- Average
- Low
- Unknown
The benefit:
- You avoid wasting time recovering junk
- You see what is in good shape before paying for a license if your case is big
- You can decide if it is worth pushing a dying drive further
On my dead external, files with “high” all recovered clean. The ones marked “low” were hit or miss, which matched the label.
The free version is not fake
Some tools pretend to be free then block everything at the last click. This one is closer to:
- Full scan
- Full preview
- Limited amount of data you can restore without buying
That makes it useful for:
- Small mistakes, like deleted homework, one PDF from the desktop, a few photos from a card
- Testing whether your important files are there and openable before buying
Use it like this:
- Install it on a different drive than the broken one.
- Scan the target drive.
- Check if your important stuff opens in preview.
- If it looks fine and the total size is small enough, recover for free.
- If it is bigger, at least you know you are not paying blind.
Camera and drone footage recovery is weirdly good
I fly a DJI drone and use a GoPro. At one point I fully wiped an SD card from the drone by mistake, then shot new footage on top of it.
Most recovery apps will:
- See fragments of old video
- Restore partial files that do not play
Many cameras write video data in little chunks scattered around the card. When things go wrong, those chunks exist, but you need something that knows how to stitch them back.
Disk Drill has an “Advanced Camera Recovery” mode. On my DJI card:
- It found four older video files I thought were gone
- Output played from start to end
- No weird artifacts, no zero-byte files
I repeated this on:
- A GoPro card after deleting clips manually
- A Canon camera card after a format
Results were similar. It did better with action cameras and drones than the others I tested, especially on long clips.
How the disk image feature saved a dying USB stick
Different story. Small USB flash drive from a conference, used daily for a year. It suddenly:
- Took a long time to show up
- Started disconnecting mid-copy
- Gave read errors
Running a long scan on a dying stick is a gamble. Every read hits it more.
Disk Drill includes:
- Byte-to-byte backup to an image file
What I did:
- Created a full sector image of the USB to a healthy internal SSD.
- The tool showed a visual surface map, with:
- Blocks that read fine
- Blocks with issues
- It skipped bad sectors on the first pass to get as much data as possible fast.
- After the image was done, I put the USB aside.
- I ran all recovery attempts against the image only.
The flash drive completely died within a week. The image let me keep working on recovery without touching the physical device again.
If your drive is:
- Making strange noises
- Disconnecting randomly
- Slowing to a crawl
Stop poking it. Take a sector-by-sector image first with something, then recover from that image. This piece alone is worth knowing about.
The health monitoring is boring but useful
There is a S.M.A.R.T. section. It shows:
- Temperature
- Reallocated sectors
- Pending sectors
- General drive status
I started checking my older HDDs once a month. One of them:
- Showed growing reallocated sector counts
- Had a worse overall health rating
I cloned it and replaced it before it died. That disk later started clicking, so that decision was correct.
If you are not watching S.M.A.R.T. data at all, use any tool that reads it. Disk Drill doing it in the same app is handy.
File deletion “safety net”
There is a feature called Recovery Vault. When turned on, it:
- Tracks additional metadata about deleted files
- Does not keep full copies of everything, just info
Effect in practice:
- If you delete something from a protected drive, later recovery has a higher chance of:
- Original filename restored
- Original folder path
- Cleaner results
I keep it enabled on my main work SSD. It does not feel heavier or slower, and it helped me pull back a deleted folder with structure intact once.
One license across Windows and macOS
My setup:
- Main desktop on Windows
- MacBook used on the road
License behavior:
- One purchase worked on both platforms for me
- I scanned an external drive on Windows, paused, then opened the results on macOS to continue
If you jump between systems a lot, this saves you buying two separate tools.
Most similar utilities I tested were either “Windows only” or had separate Mac pricing.
RAID users, quick note
I do not run RAID at home, but I tried it on:
- A simple software RAID 1 mirror in Windows Storage Spaces
What it did:
- Detected the logical RAID volume
- Showed member disks
- Let me scan the virtual volume
Documentation claims support for:
- RAID 0, 1, 5, 6, 10, 1E
- JBOD
For anything enterprise-level, I would still talk to a pro lab. For small home or office software RAID, it is useful that it at least recognizes the arrays.
Where I think it fits
Whenever I see threads like “Disk Drill vs [other tool]” my mental checklist is:
Use it if:
- You are on Windows or Mac
- You lost files from:
- External drives
- SD / microSD
- USB sticks
- Internal HDDs or SSDs
- You care about photo and video recovery
- You want previews and success ratings before paying
Look elsewhere if:
- You need native Linux only
- You deal with complex hardware RAID controllers
- The drive has physical damage like loud clicking, scraping, or BIOS not detecting it at all
Personal hit rate:
- External HDD: recovered all important stuff
- Dying USB stick: got most of it from an image
- Camera and drone cards: best results compared to three other apps I tried
- Random “oops I deleted that folder” cases: no drama
If you are in panic mode right now, my steps would be:
- Stop writing to the problem drive or card.
- If it behaves badly, make a disk image to another drive.
- Run Disk Drill on the image or device.
- Use preview and recovery chance to pick what to restore first.
- Recover to a separate healthy drive, never to the same one.
That process alone will save you from making things worse.
2 Likes
Go with Disk Drill for this one.
You deleted a folder from an external drive. File system is still fine. No RAW volume, no clicking, no weird behavior. That type of loss is exactly where Disk Drill tends to beat Stellar for photos.
Quick compare from what I have seen:
- Photo recovery quality
Disk Drill
- Better at grouping photos by folders and dates on healthy or slightly damaged file systems
- Strong previews for JPG, PNG, RAW formats from cameras
- Handles mixed family trip stuff well, like phone pics, DSLR, random screenshots
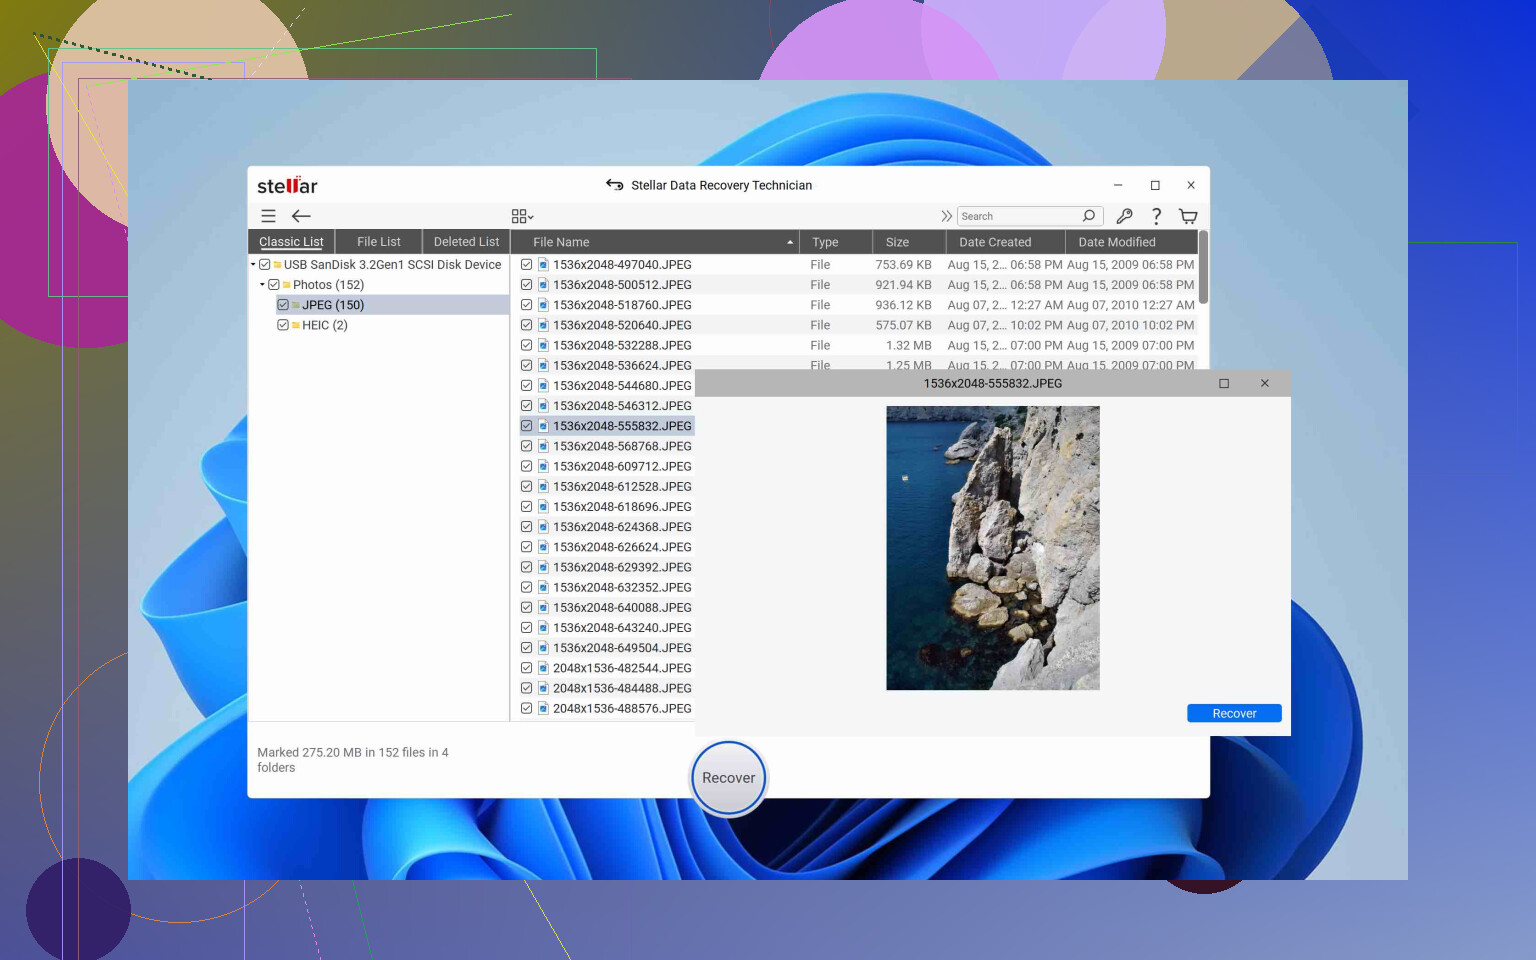
Stellar Data Recovery
- Decent raw scan, but often dumps photos into one big bucket with generic names
- I have seen more broken previews from Stellar when the deletion was recent but there was some light fragmentation
You want fast visual confirmation. Disk Drill gives clearer previews and that “recovery chance” score you saw in @mikeappsreviewer’s post. I trust that more than Stellar’s long file lists.
- Workflow for your exact case
Your scenario
- Deleted folder
- External HDD
- Thousands of photos
Disk Drill tends to:
- Find the original folder tree more often on drives that still mount
- Keep album structure closer to what you had
- Let you filter by image type fast, like JPG, HEIC, RAW
Stellar can do it, but it often feels slower to browse. The UI is more wizard-like and less “browse as you go”. For thousands of family photos, that gets old fast.
I disagree a bit with @mikeappsreviewer on one point. They lean hard on not touching advanced options. For your specific case, I suggest this tweak in Disk Drill:
- Run the default all-in-one scan first
- Then use filters for Pictures and sort by path and date
You get to your trip photos faster instead of scrolling through every document from the drive’s lifetime.
- When Stellar makes more sense
I would consider Stellar instead of Disk Drill if:
- You need Linux recovery from inside Linux OS
- You work with odd formats from security cameras or DVRs
- Company is paying and you need invoice plus formal support channel and do not care about interface comfort
For a home photo disaster like yours, Disk Drill tends to be the better fit.
- Practical steps specific to your case
Do this to avoid making things worse:
- Stop copying anything new to that external drive
- Install Disk Drill on a different drive, not the external
- Scan the external with Disk Drill, then:
- Filter to Pictures only
- Use search with parts of folder names or date ranges
- Preview multiple photos across the set, not only one or two
If the previews look clean and the folder structure matches what you remember, pay once and recover everything to another disk, not back to the same external.
- About “data loss prevention” going forward
Once you get those photos back, set up some basic protection. A simple plan like:
- One local backup drive
- One cloud backup account
- Occasional S.M.A.R.T. health checks on drives
If you want a deeper explainer on how to stop this kind of mess before it starts, this guide on protecting your files from future data loss is worth a read. It focuses on keeping data safe across devices, not only on rescue tools.
Short version for your decision
Deleted folder with family trip photos from an external drive, no obvious hardware failure. In that situation:
- Disk Drill is usually better for photo recovery quality and folder structure
- You get clearer previews and more practical filtering for a big batch of pictures
- Stellar is fine, but feels slower and less friendly for this exact scenario
So I would start with Disk Drill, confirm your photos in preview, then recover from there.
Short version: for “oops, deleted a huge photo folder from a healthy external drive,” I’d pick Disk Drill over Stellar almost every time.
Couple of angles that @mikeappsreviewer and @nachtschatten already covered, so I’ll skip repeating their whole playbook and just add where I’ve seen differences:
-
Actual photo sets vs. random file soup
Where Disk Drill has consistently been better for me is when I’m restoring albums or trip folders, not just random single files. Stellar tends to vomit out one huge “found files” list with super generic names. That’s technically a recovery but practically a nightmare when you’re trying to piece together a vacation. Disk Drill usually reconstructs more of the original folders and dates, so you end up with something closer to your old structure instead of 10,000 “file000123.jpg” clones. -
Dealing with partial corruption
I’ll slightly push back on the idea that Disk Drill always wins cleanly here. On one older spinning HDD with some mild sector issues, Stellar did surface a few extra JPEGs that Disk Drill only saw as corrupted fragments. They were ugly and half-broken, but if you’re the kind of person who’d rather have a mangled but recognizable family photo than nothing, that’s one point in Stellar’s favor.
For your case though, your drive sounds healthy and the loss is logical (deletion), not physical, so Disk Drill still comes out ahead. -
How much hand‑holding you actually want
The “wizard” style in Stellar drives me nuts, but some people really like being marched through each step. Disk Drill is more “here’s the whole playground, start browsing,” which I find quicker once you cross a few thousand files.
If you’re already anxious and just want to see your trip photos again ASAP, Disk Drill’s live preview while scanning is a big win. You can sanity‑check that the images aren’t garbage without waiting for a full scan cycle. -
When I’d personally reach for Stellar first
Just to be fair and not sound like a fanboy:- Oddball DVR / CCTV footage or strange proprietary formats
- Corporate environment where somebody up the chain only recognizes Stellar’s name on an invoice
- Very old Windows filesystems where you’re mixing data and email archives and don’t care about folder structure at all
That’s about it. For an external HDD of family photos, Stellar feels like using a sledgehammer to open a cereal box.
-
Concrete call for your situation
Since your external still mounts and this is “just” a deleted folder, I’d do this:- Install Disk Drill on your internal drive, not the external.
- Run the unified scan on the external.
- Ignore the urge to dig through every category; jump straight to Pictures, then sort by path / date.
- Verify several photos from different parts of the trip in preview.
If those previews are clean and the count looks right, Disk Drill is the one I’d pay for here. Stellar isn’t going to magically do better in this specific scenario, and it’ll likely make organizing those thousands of shots more painful.
Unrelated but in the same “don’t repeat this pain” bucket: a lot of people freak out about photos, then realize the videos from trips are gone too. If you ever need to get back erased videos on your computer without wrecking the drive further, this guide on bringing permanently deleted videos back to life on your PC walks through safe ways to do it, including what not to touch so you don’t overwrite the data you’re trying to save.
So yeah, in your exact shoes, I’d start and probably end with Disk Drill. Stellar’s not trash, just not the better fit for “big family photo folder on a healthy external HDD” in my experience.
Between Disk Drill and Stellar for a deleted-photo disaster on a healthy external drive, I’d still lean Disk Drill, but for slightly different reasons than what @nachtschatten, @viajantedoceu and @mikeappsreviewer already laid out.
They covered workflow and success stories. I’ll zoom in on a few nuances that matter when you are staring at thousands of family photos instead of generic files.
Where Disk Drill fits your exact situation
Your case sounds like:
- External drive is basically healthy
- Folder was deleted, not a dropped / clicking disk
- Mostly standard photo formats (JPG, PNG, maybe RAW)
Here Disk Drill’s mix of file system recovery + signature scan helps in two concrete ways:
-
Folder reconstruction is usually better than Stellar’s
Stellar often throws a mountain of “Lost files” with generic names. Technically that “works” but is miserable for rebuilding a trip chronologically.
Disk Drill tends to recover more of:- Original folder paths
- Filenames
- Date metadata
For a vacation or family album, that organization matters more than squeezing out a few extra broken fragments.
-
Photo sanity checking is faster
Yes, Stellar previews too, but Disk Drill’s preview + “recovery chance” works like a quick triage: you can hop through different parts of the deleted folder and see if whole sequences of photos are intact without committing to a full recovery yet.
Where I slightly disagree with the others
-
Some folks put a lot of weight on Disk Drill’s extra utilities (S.M.A.R.T., Recovery Vault, etc.).
Useful long term, but for your one crisis they are secondary. If you only care about “get my photos back, then I am out,” those extras should not drive the decision. -
Stellar is not useless for photos
I have seen cases where Stellar surfaced a few more badly damaged JPEGs than Disk Drill. If you are the type who wants every half‑recoverable shot of a specific moment, there is a narrow argument for also throwing Stellar at the disk after Disk Drill has done the main job. I would not start with Stellar though, because of the chaos it can create in large sets.
Pros of Disk Drill for lost photo recovery
-
Strong at photo & video sets
Handles SD cards, external HDDs, RAW partitions, common camera formats, and can often reconstruct continuous shoots. -
Usable interface under stress
You do not have to think about “quick vs deep”. It stacks methods automatically, which is nice when you are panicking. -
Good previews before you pay
You can see real images, not just filenames, and get a feel for what is actually recoverable. -
Cross platform
One license that works on Windows and macOS is not just a “nice to have” if you use both for photo stuff. -
Imaging option
If the external starts acting flaky later, you can image it then point Disk Drill at the image. That is a big safety net.
Cons of Disk Drill you should know
-
Not always the best on completely trashed disks
If the drive starts throwing lots of hardware errors or vanishes from BIOS, a lab or a more specialized toolset can sometimes dig deeper than consumer software, Disk Drill included. -
Big recoveries can be messy
Even with its better organization, once you cross tens of thousands of items, expect:- Duplicates from different scan methods
- Some files without original names
Sorting and de‑duping takes human time.
-
Licensing feels overkill for a one‑off user
If you truly only ever need this once, the cost can sting. In that case using the free preview to confirm your photos are there before buying is essential. -
Linux users are second‑class citizens
No native Linux version, which might matter less here but is a downside in mixed environments.
How it compares in practice to Stellar for your use case
Summing up for “deleted trip folder on a working external HDD”:
-
Disk Drill
- Better for: Recovering a coherent photo library with usable structure and quick previews.
- Pain point: You still need to clean up duplicates and maybe some nameless “reconstructed” files.
-
Stellar
- Better for: Edge cases, weird file mixes, or when you want to hunt for the last, heavily damaged photo remnants after a first pass with something else.
- Pain point: Larger photo sets easily turn into one giant, disorganized bucket.
Given what you described, I would:
- Use Disk Drill as the primary recovery tool for the deleted folder.
- Only consider Stellar after that if you discover a very small set of especially important photos missing and are willing to dig through a mess to maybe find a few broken versions.
That balance lines up with what @nachtschatten, @viajantedoceu and @mikeappsreviewer found, but I would put slightly less emphasis on Disk Drill’s bonus utilities and slightly more on the “do I get my albums back in a form I can actually live with” angle.